

How To Install Base Cabinets In A Kitchen
How to Install Kitchen Cabinets
Updated: Apr. 21, 2022
With these basic techniques, you can learn how to install kitchen cabinets direct, solid and true
Install kitchen cabinets—base, wall and peninsula—using professional techniques. Hanging cabinets is easy and you'll save on your side by side kitchen remodel.
You might also like: TBD
- Time
- Complication
- Cost
- A full twenty-four hour period
- Intermediate
- Less than $20
Larn how to build your own custom kitchen cabinets without the custom cost: Cheque out How to Build Kitchen Cabinets taught by Steve Maxwell!
How to Install Kitchen Cabinets Step 1: Order the cabinets and gather cardinal tools and materials
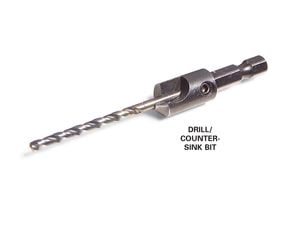
Special combination drill scrap
This special bit saves time because information technology bores a pilot pigsty for the screw and a countersink hole for the screw caput.
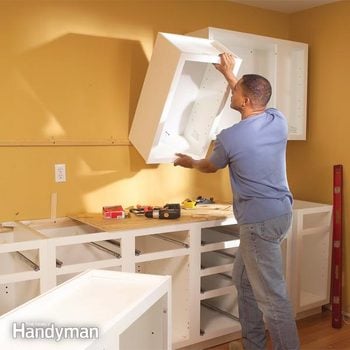
Learning how to install kitchen cabinets may seem intimidating, only the techniques are really quite simple. Think of it every bit screwing a series of boxes to the wall and to 1 another in the proper sequence. If your cabinet plan is correct, your principal job is to detect the best starting point and keep everything level. In this story nosotros'll show you how to install kitchen cabinets and chief these cardinal steps. We'll tell you how to lay out the chiffonier positions alee of time to avoid missteps. And so we'll show y'all how to install the base cabinets so they're perfectly aligned and ready to be measured for the new countertop. Last, nosotros'll prove yous a simple method for installing the upper wall cabinets. The entire how to install kitchen cabinets project typically takes less than a 24-hour interval. And depending on how large and elaborate your kitchen is, y'all'll save at least $500 (and probably much more) in installation charges.
You lot merely need a few basic tools to practise a first-class job. You lot'll demand an accurate 4-ft. level, a screw gun powerful plenty to drive 2-i/2-in. screws and a couple of expert screw clamps that open to at to the lowest degree 8 in. Purchase a i/viii-in. combination drill/countersink bit for predrilling the screw holes. You'll also need a block plane or belt sander for fine tuning the cuts to fit. A 1-lb. box of ii-1/two-in. screws and three bundles of shims will be enough for nearly any kitchen total of cabinets.
Make certain you have the correct cabinets
The cabinets shown are called "face frame" cabinets, meaning they have a iii/4-in.- thick frame surrounding the forepart of the chiffonier box. "European" style (too called "frameless") cabinets are simple boxes without the face up frame, and they crave a few special installation steps that we won't encompass in this article.
Nosotros won't cover planning and ordering your cabinets here either. Merely about any home center or lumberyard that sells mill-built cabinets will help you custom-pattern your kitchen chiffonier layout. All the staff needs is a drawing of your existing kitchen floor plan consummate with verbal appliance locations and room dimensions. Just before you finalize the order, closely examine the estimator screen and/or printout to make sure doors swing the correct direction, end cabinets have finished panels on the ends, and toe-boot boards (1/four-in.-thick strips of finished wood for trimming cabinet bases) and filler strips are included. Nosotros highly recommend that yous club at least two extra filler strips for backups in case of miscuts. Keep a copy of the printout; you'll need it to guide your installation.
When your cabinets arrive, open up the boxes immediately and ostend that each chiffonier matches the i on the plan, all the parts are included and there'southward no damage. A single error can delay the unabridged project. In our society, one cabinet was 6 in. undersized, the toe-kick trim boards were missing and ii of the cabinets were seriously damaged. Believe me, it happens!
Next, bank check out some trending kitchen cabinet paint colors that volition brand a splash.
How to Install Kitchen Cabinets Step ii: Base cabinets: Fix the chiffonier elevation and cabinet social club
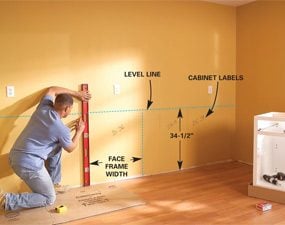
Kitchen Floor Cabinets Photo 1: Mark the chiffonier elevation
Describe a level line on the wall 34-i/2 in. above the highest spot on the floor. Draw vertical lines to marking each cabinet location, label each cabinet's position on the wall and find and marker the studs.
Notice the highest spot on the floor
Most kitchen floors are very apartment, peculiarly in homes less than twoscore years old. But earlier installing cabinets, it'south e'er best to confirm that by looking for the highest spot on the floor anywhere a chiffonier volition sit down. You'll mensurate upwards from that spot and draw a level line to define the top of all of the base cabinets (Photo 1).
Find that spot with a straight 8-ft.- long 2×4 (or shorter to fit betwixt the end walls if needed) and a 4-ft. level. Rest the 2×4 with the level on top about ane ft. abroad and parallel to the wall and shim the 2×4 until it'south level. Then marker the highest spot on the flooring and echo near any other walls that'll have cabinets. Continue until you detect the highest spot. If you have two high spots, rest the board on both and find the highest ane. Measure up the wall backside that spot exactly 34-1/2 in. (standard cabinet height) and mark the wall at that signal. Using that mark as a starting betoken, draw a level line forth the walls wherever base cabinets are planned (Photo 1).
Exam-fit the base cabinets
In most cases, the corner cabinets determine where the rest of the cabinets go. That's specially true with lazy Susan corner cabinets, which have face frames facing ii directions and have to meet adjoining cabinets perfectly. Our kitchen'southward "blind-corner" cabinets (Photograph two) are a flake more forgiving. Check your cabinet layout by "dry-fitting" all the base of operations cabinets, starting with the corner ones, and setting all the cabinets in identify as tightly together as possible. If the layout calls for filler strips, make certain to leave spaces for those, too. With the cabinets in place, check to brand sure drawers and doors articulate ane some other, appliance openings are the proper widths and sink bases centre under windows above. Unless your chiffonier plan is flawed, any adjustments you'll need to make are just a matter of ripping filler strips narrower or using wider ones. Next, remove the shelves, drawers and doors and marker them and their matching cabinets with numbered masking tape to relieve time and confusion afterward. So move the cabinets out of the room.
Starting with the corner cabinets, carefully measure, depict and characterization each base of operations cabinet and appliance location on the wall. Use a 4-ft. level and a pencil (Photo 1). The marks should reflect the width of the face frame, not the cabinet back. (The cabinet back is actually 1/2 in. narrower than the forepart, ane/4 in. on each side.) Use a stud finder or probe with nails to discover and marking the stud locations just above the horizontal leveling line.
How to Install Kitchen Cabinets Step 3: Kitchen base cabinets: Level and gear up the boxes
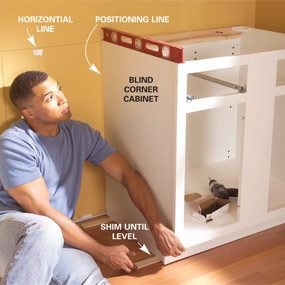
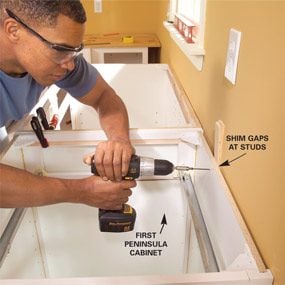
Kitchen Floor Cabinets Photograph 2: Position the showtime cabinet
Set the showtime chiffonier 1/4 in. from the positioning line and shim the base of operations until the top is even with the horizontal line and level from front to back. Drive 2-1/ii-in. screws through the dorsum into the wall studs to anchor it.
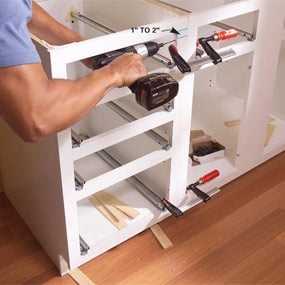
Kitchen Floor Cabinets Photograph 3: Screw confront frames together
Shim the next chiffonier even with the horizontal line and level it. Clamp the frames together, drill 1/8-in. pilot holes, and screw the frames together with ii-1/2- in. screws. Then spiral the chiffonier to the wall studs.
Position the corner cabinets ane/4 in. away from the vertical positioning lines. Shim the base until the chiffonier top is fifty-fifty with the horizontal leveling line and and so level and shim the chiffonier front to back (Photo ii). If there's a gap between the wall and the cabinet back (the wall isn't exactly plumb or straight), sideslip in shims and run screws into the studs through the cabinet dorsum about 1 in. downwards from the top (come across Photo 8). Afterwards all the base cabinets are set, score the shims with a utility pocketknife and snap them off even with the cabinet top.
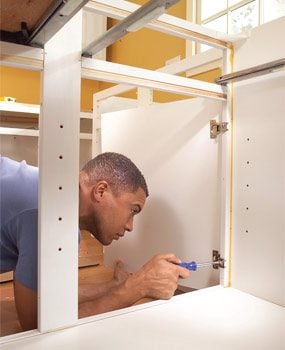
Position, level and shim the next cabinet and clench it to the outset cabinet (Photograph 3). Run your fingers over the joint and you'll be able to feel if it's misaligned. Loosen each clamp one at a fourth dimension and tweak the chiffonier frames until they're perfectly flush, then retighten the clamp. Be fussy! Sometimes you'll have to loosen the screws belongings the previous cabinet against the wall and pull it away slightly to get the frames aligned. When you're satisfied, drill pilot holes through the frames 1 to two in. from the top and bottom of the cabinet interior.
Make sure y'all're drilling straight. The most common mistake is to run the bit through the front of the chiffonier frame! With the face-frame screws in place, remove the clamps and screw the cabinet to the wall. Echo the same process for each consecutive cabinet.
How to Install Kitchen Cabinets Step iv: Base cabinets: Add filler strips
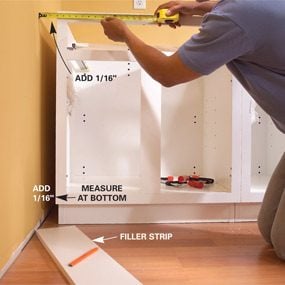
Kitchen Floor Cabinets Photo 4: Measure the gap
Mensurate the gap betwixt the wall and the stop cabinets at the top and bottom. Add one/16 in. to each measurement and depict a cut line on the behind of a filler strip.
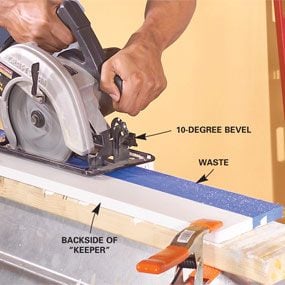
Kitchen Floor Cabinets Photo five: Cut the filler strip
Clamp the filler strip and cutting it at a 10-degree bevel from the behind so the wide edge of the "keeper" piece faces the forepart.
Kitchen Floor Cabinets Photo 6: Fit and install the filler
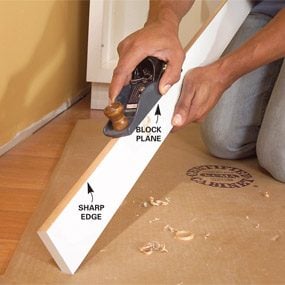
Test-fit the filler strip and plane the sharp edge of the bevel until information technology fits perfectly. Set the strip in identify, predrill and screw it to the cabinet frame.
Add filler strips wherever the cabinets come upwardly short of walls every bit we show in Photos 4 – six or wherever the plan calls for them. Leave the correct gaps for appliances. Some built-in appliances like dishwashers crave very verbal openings.
All manufacturers offer filler strips to match the wood blazon and end of their cabinets. Mostly they'll offer widths about 3, 6 and 8 in. cut in the same lengths as the top of the chiffonier face frames. They fill spaces betwixt end cabinets and walls, create additional spaces between cabinets or between cabinets and appliances for drawers and doors to articulate, and close upwardly odd gaps (Photograph four).
Spaces between cabinets and walls are rarely even, then you'll have to taper many filler strips. The all-time strategy when installing cabinets is to overcut slightly (1/xvi in.), then plane or belt-sand the border back. The 10-degree bevel simplifies this process (Photos 5 and vi). If you take a large piece left over, protect the surface with masking record equally we testify and use it elsewhere. You won't be able to clench filler strips when they're against walls, then fit them tightly to make drilling and screwing them to the cabinet easier. Fillers that are less than 6 in. wide can "float" confronting the wall and need no support. Simply fillers more than than 6 in. broad should be supported. Boom them to a 1×2 backer board that'south glued to the drywall directly behind the filler.
How to Install Kitchen Cabinets Step five: Base of operations cabinets: Brand plumbing and electrical cutouts
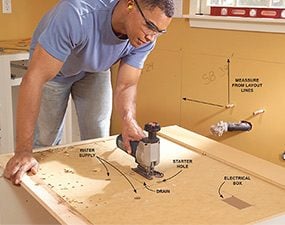
Kitchen Floor Cabinets Photograph 7: Cut plumbing openings
Lay out plumbing and electrical openings on the chiffonier back, using the layout lines on the wall as reference points. Then drill and/or saw out the openings.
You'll probably have to cut openings for the bleed and water supply lines and for outlets (Photo 7). Lay out the openings by measuring from the layout lines at the peak and side, and so transfer those numbers to the back of the cabinet. To avoid confusion, practise the layout work with the chiffonier near its position and in the correct orientation. Drill holes for h2o supply lines and starter holes for square openings with a i-in. spade bit. Stop drilling when the tip just penetrates the back, and finish the holes from the within of the chiffonier to prevent splintering the cabinet interior. Cut square openings with a jigsaw. If your bleed line projects from the wall at an angle, simply cut a rectangular hole effectually it as we did.
How to Install Kitchen Cabinets Pace 6: Fix the peninsula cabinets
Kitchen Floor Cabinets Photograph 8: Prepare the offset peninsula cabinet
Orient the showtime peninsula cabinet at a correct angle to the wall. Level and clamp it to the adjacent cabinet and spiral it to the chiffonier and the wall.
Kitchen Floor Cabinets Photo ix: Mark the position of the 2nd cabinet
Position the side by side cabinet in line, clench it and depict a line effectually the base. Make sure it'south at a correct angle to the other base cabinets. Prepare the cabinet bated.

Kitchen Floor Cabinets Photo ten: Install 2 x 2 back up
Depict a second line to mark the thickness of the cabinet base of operations, and then screw 2x2s to the floor forth the inner line.
Kitchen Floor Cabinets Photo eleven: Set the cabinet
Lower the cabinet over the blocking. Shim, clamp and screw the frames together. Screw the cabinet to the blocking with two screws from each side.
Level and screw the first peninsula cabinet to the adjoining standard base cabinet. Yous'll probably have to make full a 1/4-in. gap with shims before screwing it to the wall studs (Photograph 8). If the first peninsula cabinet is but 2 ft. wide, you may have to clamp and spiral filler strips to the frame so doors and drawers in the next cabinet will accept operating clearance at the inside corner. This should be marked on your plan.
After the first peninsula chiffonier is in place, anchor the cabinets that follow to permanent blocks on the flooring. To do that, position the next peninsula cabinet and outline its base on the floor with a pencil (Photo 9). Then screw 2-by blocking to the flooring after allowing for the cabinet base thickness (Photo 10). Don't try to place or cut the blocks perfectly. They can be brusque of the cabinet cease by a couple of inches and back from the within of the cabinet 1/8 in. or then. That way you won't take to struggle to fit the chiffonier over the blocks. Screw the blocks into the subfloor with 2-one/2-in. screws spaced virtually every foot. Fix the cabinet into place, level it with shims, then clench and spiral it to the neighboring cabinet and into the blocking.
Ballast island cabinets using the same positioning and blocking techniques we show for the peninsula cabinets. However, it'south best to install your upper cabinets before starting on an island to keep a clear work surface area in the middle of the kitchen.
How to Install Kitchen Cabinets Step 7: Install the upper cabinets
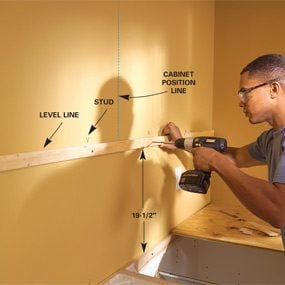
Kitchen Flooring Cabinets Photo 12: Marker the chiffonier positions
Draw a level line nineteen-1/2 in. higher up the lower cabinets and marker the upper chiffonier positions. Screw a one×2 ledger to the wall fifty-fifty with the level line.
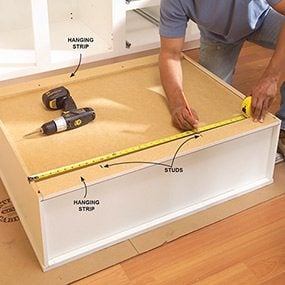
Kitchen Floor Cabinets Photo 13: Marker stud locations
Measure from the cabinet position lines to the stud locations. Mark the stud locations on the cabinet backs and drill 1/8-in. pilot holes through the hanging strips.
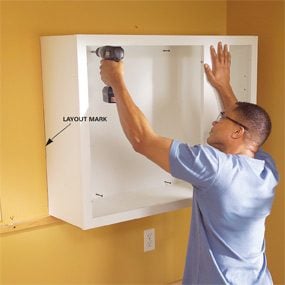
Kitchen Flooring Cabinets Photo fourteen: Screw the cabinets to the wall
Start 2-1/2-in. screws, then balance the chiffonier on the ledger. Marshal it with the cabinet position line and drive the screws into the wall studs.
Kitchen Flooring Cabinets Photo 15: Hang additional cabinets
Position the next cabinet and run the pinnacle screws partially into the studs to hold it in place. Align the frames, clench them and screw the cabinets together. And so screw the cabinet to the wall.
The only tricky part nearly installing hanging upper cabinets is supporting them in exactly the right position while you screw them to the wall and one another. That's a tough, bad-mannered chore, specially if you're working alone. The ledger method simplifies this (Photo 12). It'south a fail-rubber method, but y'all'll have to have a bit of patching and paint retouching to repair the screw holes left from the ledger.
Showtime by making a light pencil marking 19-1/two in. upwards from the lower cabinets (information technology'll be 18 in. after the countertop is installed) and and so mark the stud locations using the ones below as a guide. Side by side, transfer the cabinet positioning lines from below (Photo 12) and screw a ane×2 ledger to the studs fifty-fifty with the layout lines. It's best to prestart the cabinet screws earlier hoisting the cabinets up onto the ledger. Photo xiii shows an easy method to get the screws in the right place using the cabinet positioning lines and the stud locations on the wall and so transferring them to the cabinet. You'll often find that a cabinet, especially a narrow one, volition have but one stud behind it. Don't worry; the other cabinets will assistance support information technology likewise.
Start any corner cabinets beginning. Space the starting time end chiffonier exactly 1/4 in. away from the layout line and screw it to the wall. Exist exact with the outset cabinet because information technology volition define the locations of all the rest of the cabinets on that wall.
Start the screws and hoist the side by side cabinet into place, snugging its frame against the neighboring one, and screw information technology to the wall. Next, align the frames and clench them together as you did with the base of operations cabinets (Photo 15). You'll probably have to dorsum out the stud screws slightly in one or both cabinets to become the frames to line up perfectly. That's fine—get out the screws backed out while you clamp, drill and screw the frames together.
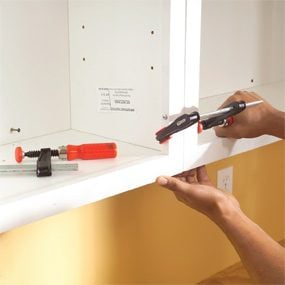
How to Install Kitchen Cabinets Step 8: Stop with doors and trim
Kitchen Flooring Cabinets Photo 16: Install cabinet doors
Replace the drawers, then rehang the doors and suit the hinges to marshal the doors with one another.
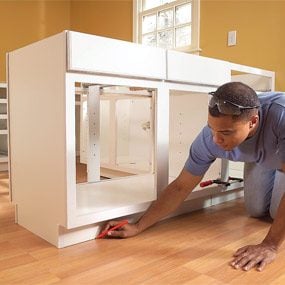
Finish off the cabinets by cutting, fitting and nailing the toe-kick boards to the bases. They'll be 4 in. broad, but on irregular floors, you may need to rip them narrower to get them to fit. If y'all have bad gaps betwixt the floor and the toe-kicks, add base shoe contoured to fit the floor. Wherever cabinets have finished ends, run the toe-kicking boards i/4 in. by the chiffonier for a nice appearance. End up by slipping the drawers into their slides and reattaching the doors (Photo sixteen). Adjust the hinges until the doors line up perfectly, and move on to installing the door and drawer pulls.
Editor's Notation: Consummate Repairs and Painting Before Starting How to Install Kitchen Cabinets Projection
Later on your old cabinets are torn out, and earlier learning how to install kitchen cabinets, is the perfect time to do any kitchen improvements. Here are some upgrades to consider:
- Electrical upgrades. Older kitchens are notorious for lacking adequate lighting and outlets. Consider adding undercabinet, task or indirect lighting and more outlets and upgrading all the outlets to GFCI-protected ones (now demanded by code). It's like shooting fish in a barrel to cut open drywall, fish new wires and install electrical boxes because you can do the work backside the cabinets. Repairs won't have to be perfect because they won't show.
- Drywall repair. Patch whatsoever holes or any other drywall harm.
- Painting. Repaint all of the walls and the ceiling. Yous'll salve the hassle of cutting in around the new cabinets and get a much neater job to boot. Y'all tin can touch up nicks and bumps later.
- Install new finished flooring if you tin. Nearly finished flooring materials tin can be installed ahead of the cabinets. That's much easier to practise considering y'all can project the flooring under the cabinets and avoid cutting around them after. Hardwood flooring, tile, most vinyl and some laminate floors can handle cabinets resting on them with no problem. But be careful. Perimeter-glued vinyl and floating wood laminate floors demand to aggrandize and contract freely. If you balance cabinets on them, you may accept bug with buckling, splitting or neat later.
Required Tools for this How to Install Kitchen Cabinets Project
Have the necessary tools for this how to install kitchen cabinets DIY project and other kitchen cabinet projects lined upwards before you start—you'll save time and frustration.
Required Materials for this How to Install Kitchen Cabinets Project
Avert last-minute shopping trips past having all your materials fix ahead of time for this how to install kitchen cabinets project. Hither'due south a list.
Originally Published: June 26, 2022

Source: https://www.familyhandyman.com/project/installing-kitchen-cabinets/
Posted by: muellercocia1974.blogspot.com
0 Response to "How To Install Base Cabinets In A Kitchen"
Post a Comment