

How To Install Http Server In Linux
Introduction
This guide will help you install the Apache web server on Ubuntu Linux xviii.04.
Apache Spider web Server is a software parcel that turns a computer into an HTTP server. That is, it sends web pages – stored as HTML files – to people on the internet who request them. Information technology is open-source software, which means it tin be used and modified freely.

Prerequisites
- A system running Ubuntu 18.04 LTS (Bionic Beaver)
- An internet connection
- Access to a user account with sudo privileges
Tools / Software
- A control-line utility (Use keyboard shortcut CTRL-ALT-T, or right-click the desktop and left-click Open Terminal)
- A firewall – the default UFW (Unproblematic Firewall) in Ubuntu is fine
- The APT package director, installed by default on Ubuntu
How to Install Apache on Ubuntu
Before installing new software, it'south a good idea to refresh your local software bundle database to make sure you are accessing the latest versions. This helps cut down on the time it takes to update after installation, and it besides helps forbid zero-twenty-four hour period exploits against outdated software.
Open up a terminal and type:
sudo apt-become update Allow the package manager terminate updating.
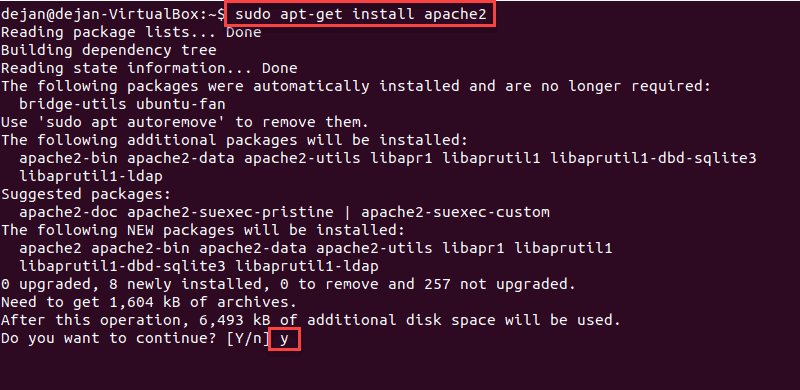
Step 1: Install Apache
To install the Apache package on Ubuntu, use the control:
sudo apt-get install apache2 The organization prompts for confirmation – do so, and allow the system to complete the installation.
Pace 2: Verify Apache Installation
To verify Apache was installed correctly, open up a web browser and type in the address bar:
http://local.server.ip The web browser should open a page labeled "Apache2 Ubuntu Default Page," as in the image below:
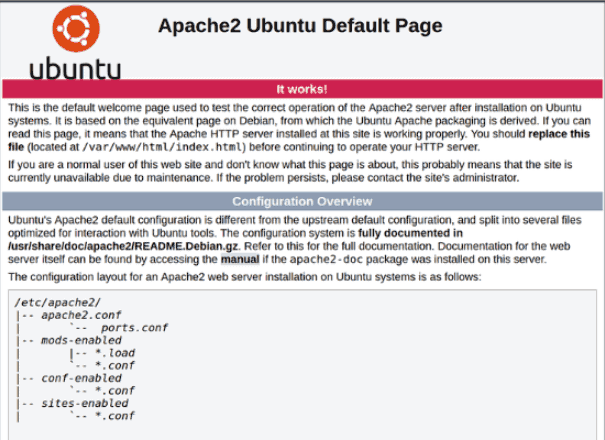
Note: Supplant local.server.ip with the IP accost of your server. If you are unsure what'south the IP accost, run the following terminal command:
hostname -I | awk '{print $1}' The output will render your server'due south IP address.
Step 3: Configure Your Firewall
Although the Apache installation process is consummate, there is 1 more than boosted step. Configure the default UFW firewall to allow traffic on port fourscore.
Start past displaying bachelor app profiles on UFW:
sudo ufw bear witness app list The terminal should respond by listing all available application profiles, as seen in the case below.
Available applications: Apache Apache Full Apache Secure OpenSSH Utilize the following command to allow normal web traffic on port fourscore:
sudo ufw allow 'Apache' 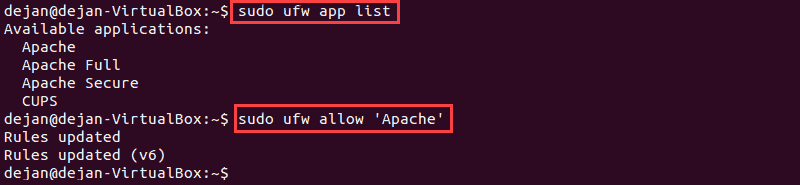
Verify the changes past checking UFW status:
sudo ufw condition 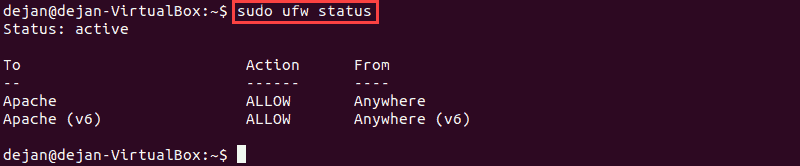
If you have other applications or services to let, make sure you configure your firewall to let traffic. For example, using the sudo ufw allow 'OpenSSH' control volition enable secure, encrypted logins over the network.
Note: At this indicate, your Apache service on Ubuntu is up and running. If y'all are familiar with Apache, a next common stride is setting upwardly Apache virtual hosts.
Apache Configuration
Apache Service Controls
When managing a web server, it'southward helpful to have some level of command over the service. You'll probably find yourself reloading or restarting Apache quite oftentimes, as you lot make configuration changes and test them. Notwithstanding, it'due south also helpful to be able to finish (and get-go) the Apache service as needed.
This operation uses the systemctl command, with a series of switches:
Stop Apache:
sudo systemctl end apache2.service Beginning Apache:
sudo systemctl start apache2.service Restart Apache:
sudo systemctl restart apache2.service Reload Apache:
sudo systemctl reload apache2.service Apache Configuration Files, Directories and Modules
At present that y'all take Apache installed, there are a couple of other things yous will need to be aware of to make content bachelor online. Most of all, this means dealing with directories and configuration files.
Directories
Afterward installing, Apache by default creates a document root directory at /var/world wide web/html.
Any files that you place into this directory are available to Apache to distribute over the network. Which ways, this is the place where you copy web page files you want to publish. This is also where yous would want to install content direction systems, such equally WordPress.
Configuration Files
Equally mentioned in a higher place, website content is stored in the /var/www/html/ directory. You can create subdirectories inside this location for each different website hosted on your server.
Apache creates log files for whatsoever errors it generates in the file /var/log/apache2/error.log .
It also creates access logs for its interactions with clients in the file /var/log/apache2/admission.log .
Like many Linux-based applications, Apache functions through the apply of configuration files. They are all located in the /etc/apache2/ directory.
Here's a list of other essential directories:
-
/etc/apache2/apache2.conf– This is the primary Apache configuration file and controls everything Apache does on your organization. Changes here impact all the websites hosted on this motorcar. -
/etc/apache2/ports.conf– The port configuration file. You can customize the ports Apache monitors using this file. Past default, Port 80 is configured for http traffic. -
/etc/apache2/sites-available– Storage for Apache virtual host files. A virtual host is a record of one of the websites hosted on the server. -
/etc/apache2/sites-enabled– This directory holds websites that are ready to serve clients. Thea2ensitecommand is used on a virtual host file in the sites-bachelor directory to add sites to this location.
At that place are many directories and configuration files, which are detailed in the Apache Ubuntu documentation. These can be used to add together modules to raise Apache's functionality, or to shop additional configuration information.
Modules
If you intend to work with software modules – applications that aggrandize or enhance the functionality of Apache – y'all can enable them by using:
sudo a2enmod name_of_module To disable the module:
sudo a2dismod name_of_module Glossary
- UFW – Simple Firewall, a software application that blocks network traffic (ordinarily for security)
- SSH – Secure Shell, used for encrypted logins over a network
- APT – Ubuntu'south default package manager, used for installing and updating software packages
- GUI – Graphical User Interface – the "signal and click" interface of the operating system
Conclusion
This tutorial helped yous install Apache on Ubuntu using a set of elementary commands. In addition, you now know host to configure basic settings for your installation.
Was this commodity helpful?
Yes No

Source: https://phoenixnap.com/kb/how-to-install-apache-web-server-on-ubuntu-18-04
Posted by: muellercocia1974.blogspot.com
0 Response to "How To Install Http Server In Linux"
Post a Comment